Getting started

Add a New Client

Adding a new client to Shapeshifter takes about 3-5 minutes and sets up their entire job search journey. You'll import their LinkedIn profile, upload their resume, and configure their job search preferences to start tracking their progress immediately.

We recommend having the coach onboard the client (rather than sending a self-onboarding link) to ensure all information is accurately captured for the AI analysis.

Step 1: Navigate to the Add Client Screen

From your Clients dashboard, click the Add Client button in the top-right corner.

This is a screenshot of a web application interface displaying a Clients page. The left sidebar shows navigation options like Clients, Leads, Profile, and Settings, with the Clients option currently highlighted. The main content area lists clients with their names, positions, status, assignee, creation date, last login, and actions. Each client entry includes a small profile picture and an initial or name. The Add Client button is prominently displayed in the top-right corner. Some client statuses show progress bars for tasks, such as Onboarding or Career Discovery, along with due dates. The interface appears clean and modern. A small red recording indicator is visible in the bottom-left corner of the sidebar.

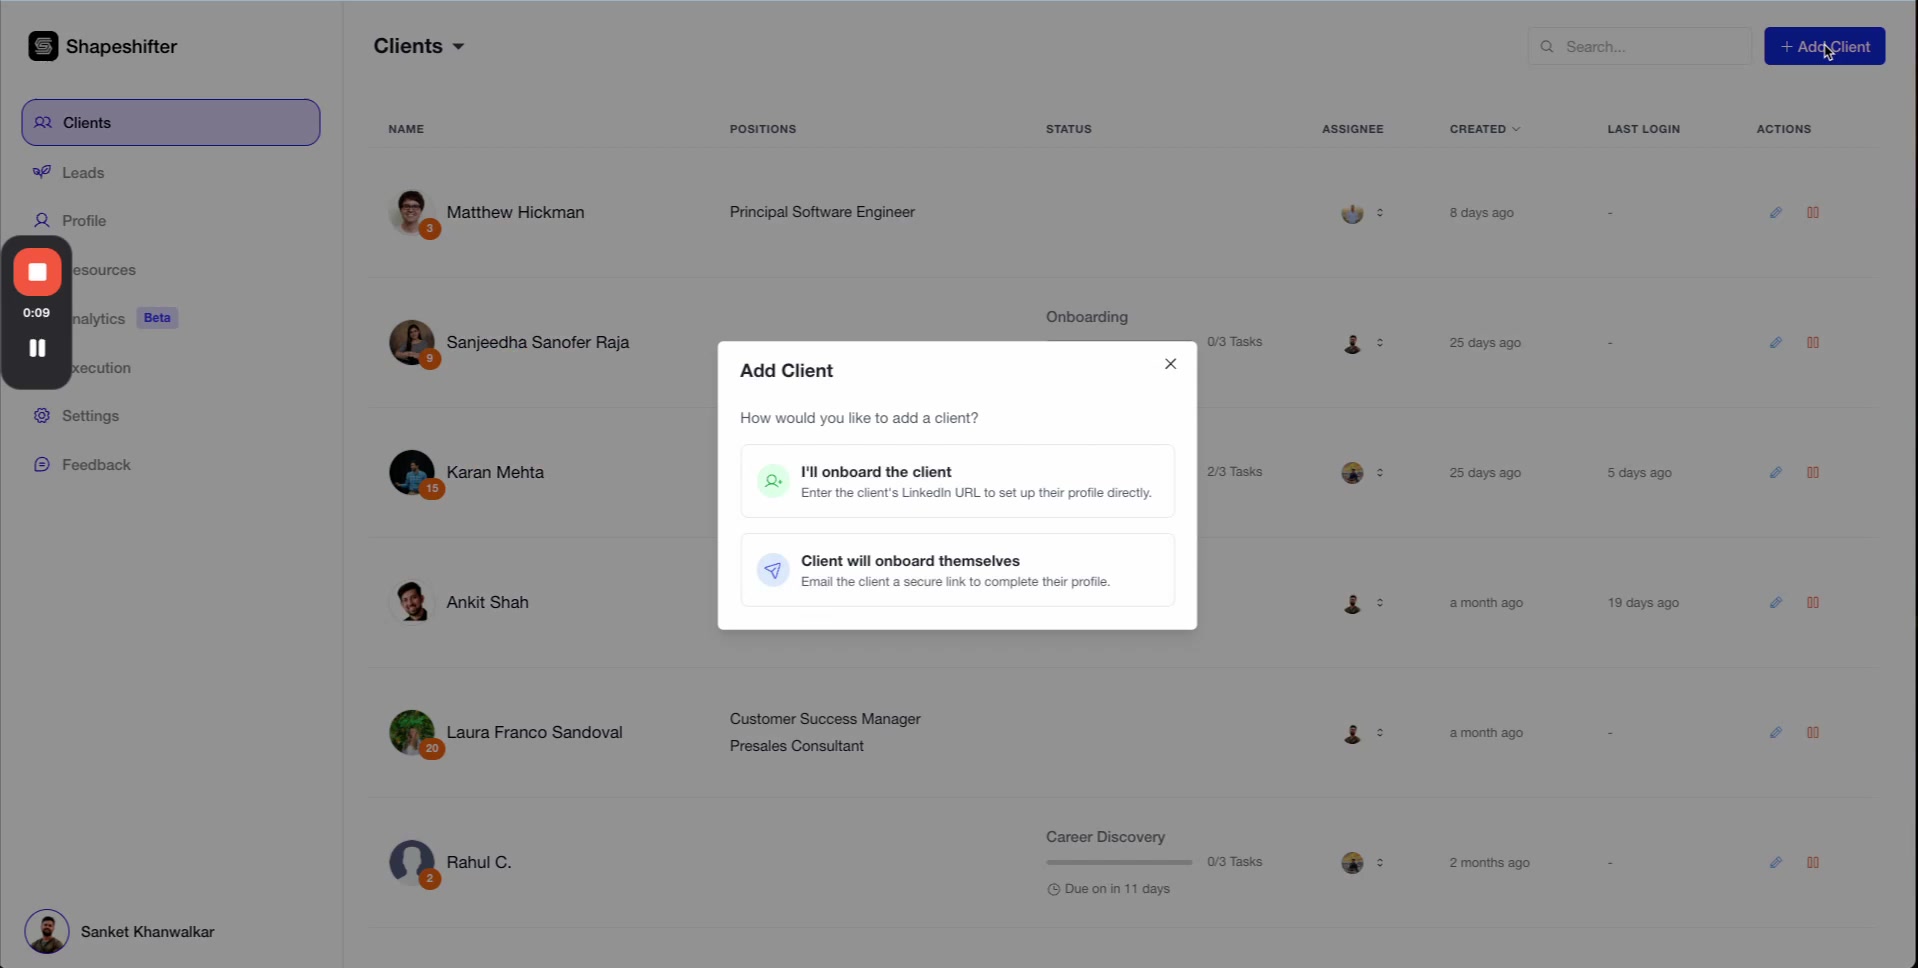
Step 2: Choose Your Onboarding Method

A modal will appear with two options:

  • I'll onboard the client — You enter their information directly (recommended for accuracy)

  • Client will onboard themselves — Send them a secure link to complete their own profile

Select I'll onboard the client to proceed with coach-led onboarding.

A screenshot of a web application interface, specifically a client management dashboard. The left sidebar shows navigation options like Clients, Leads, Profile, Resources, Analytics, Execution, Settings, and Feedback. The main content area displays a list of clients, each with a profile picture, name, position, status, assignee, creation date, last login, and actions. Several clients are visible, including Matthew Hickman, Sanjeedha Sanofer Raja, Karan Mehta, Ankit Shah, Laura Franco Sandoval, and Rahul C. A modal dialog box titled Add Client is overlaying the main content. This modal asks How would you like to add a client? and presents two options: I'll onboard the client (with a prompt to enter their LinkedIn URL) and Client will onboard themselves (with a prompt to email them a secure link). The cursor is hovering over the + Add Client button in the top right corner.

Step 3: Enter the Client's LinkedIn URL

Paste the client's full LinkedIn profile URL (for example, https://www.linkedin.com/in/chrisjphelps/) into the input field and click Get Started.

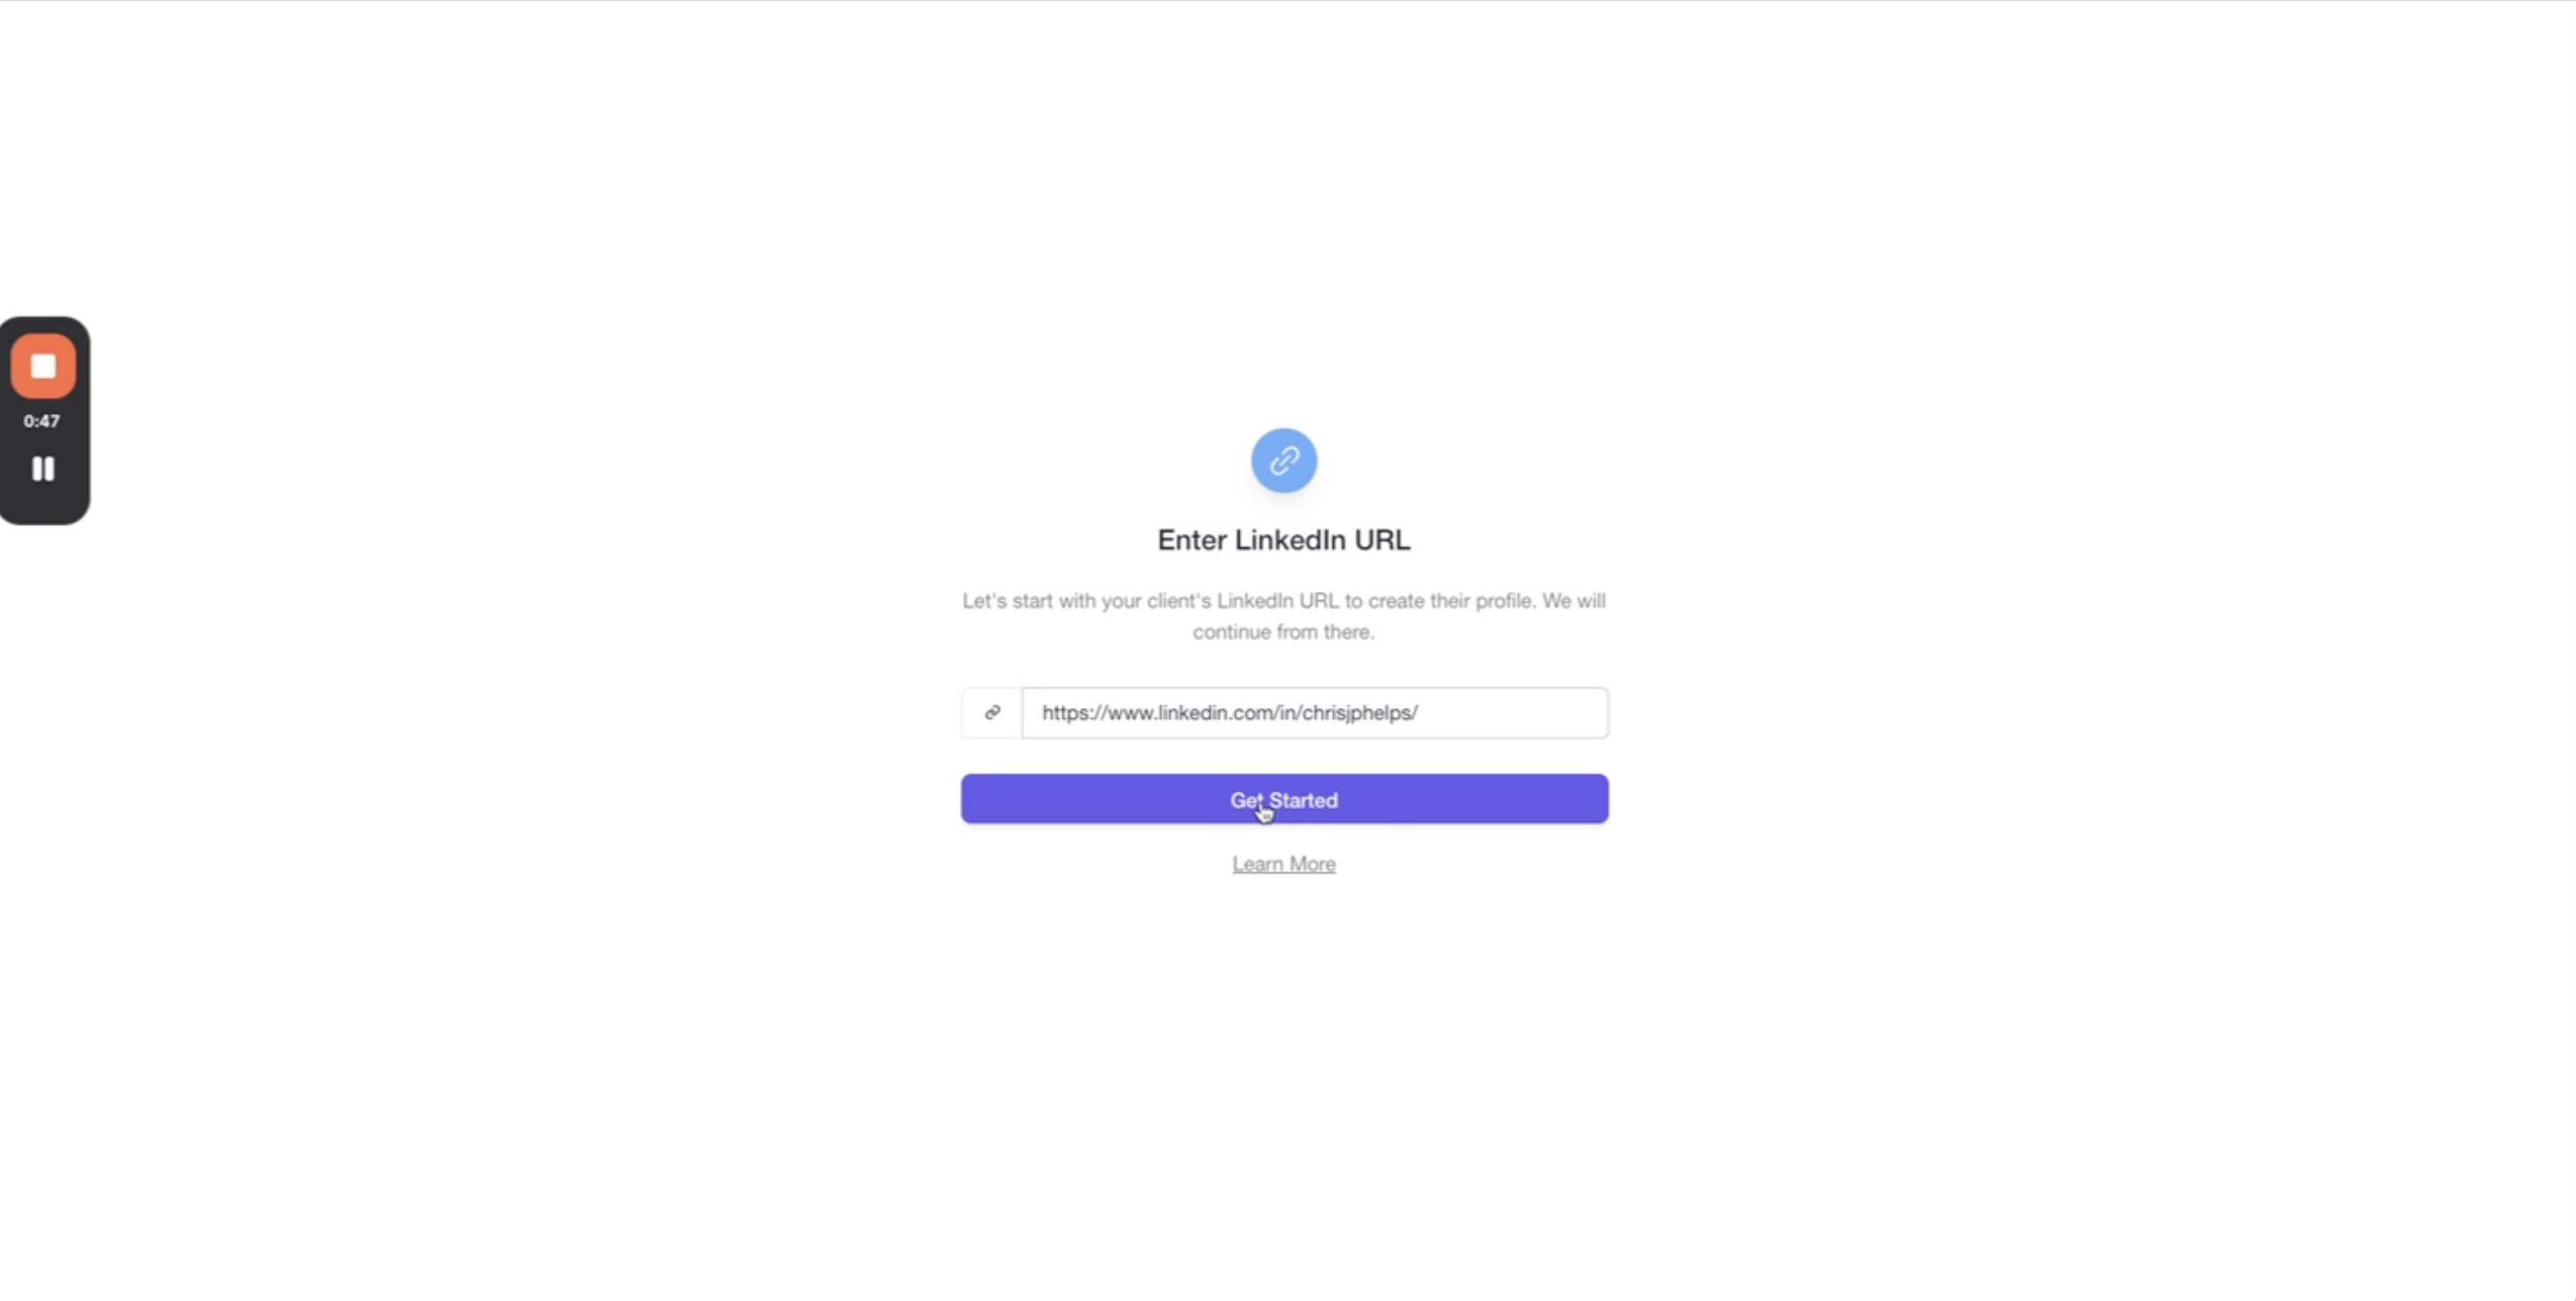
The LinkedIn URL helps Shapeshifter's AI understand the client's work history and professional background for better job matching.

Step 4: Upload the Client's Resume

You'll be prompted to upload their resume. Click the upload area to select a file or drag and drop their resume directly.

A screenshot shows a web page titled Upload Resume. At the top, there's a progress bar with two dashes. Below this, a yellow upload icon is centered. The title Upload Resume is displayed, followed by explanatory text: This resume will be used to understand Chris's work experience and skillset to analyze jobs & careers accordingly. A dashed rectangle contains the text Click to Upload or Drag/Drop a New Resume and lists supported file types: PDF, DOC, DOCX (up to 5MB). Below this, a purple button says Continue, and finally, Skip for now is an option.

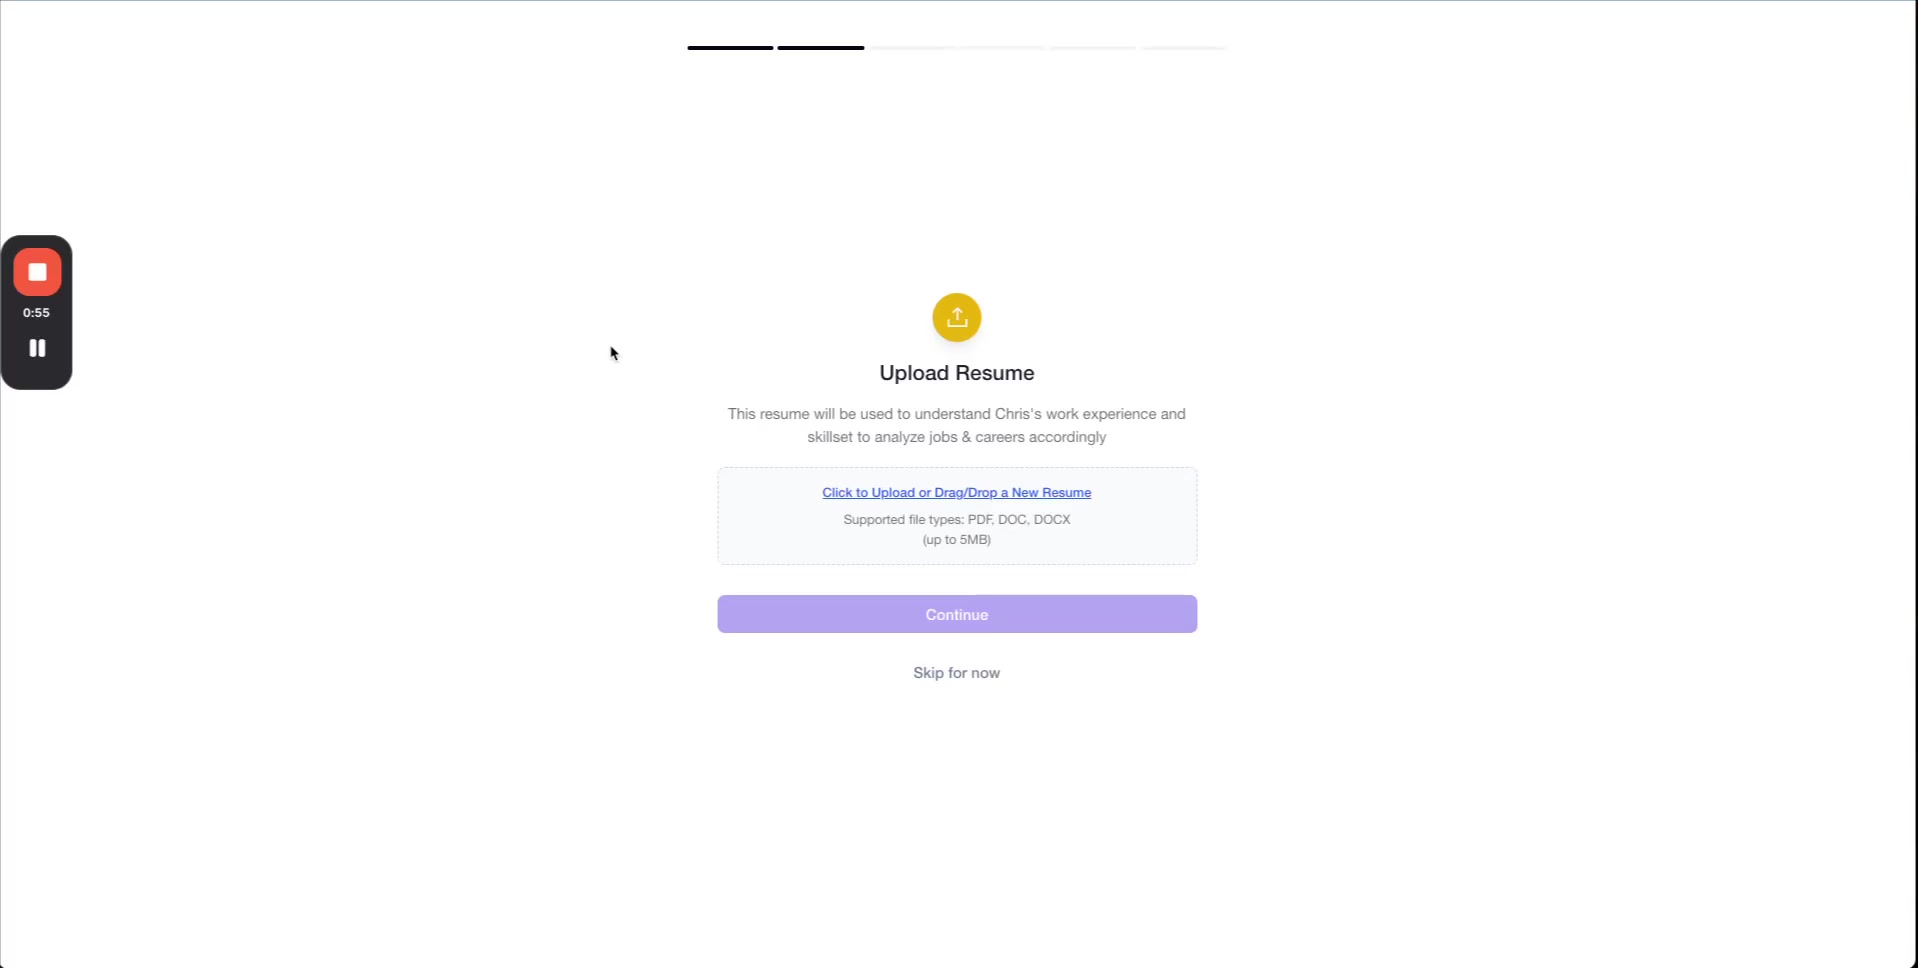
Supported file types: PDF, DOC, DOCX (max 5MB)

Once uploaded, you'll see the file name and size confirmed. Click Continue to proceed—the resume processes in just a few seconds.

Make sure the resume is current and complete since it's used by Shapeshifter's AI to match clients with relevant jobs and career paths.

Step 5: Add the Client's Email Address

Enter the client's email address. This email will be used to send them notifications about newly matched jobs and important updates throughout their journey.

A screenshot of a web page with a modal asking for an email address. The modal has a header with Email and a description saying This will allow us to notify Chris for newly fetched jobs and other important updates. Below this are an input field with an envelope icon and a purple Continue button. A recording overlay is visible on the left side of the screen with a timer, pause button, and other recording controls.

Click Continue after entering the email.

Step 6: Set Location and Job Preferences

Configure where the client wants to work and what type of positions they're interested in:

  1. Location: Start typing the city or region (e.g., "Boulder, CO, USA"). The system will auto-suggest locations.

  2. Job Type Preferences: Select one or more options: On-site, Hybrid, or Remote.

This image displays a user interface for setting job search preferences. It features a Location section with the current location set to Boulder, CO, USA. Below this, there are three job preference options: On-site, Hybrid, and Remote, all of which are currently checked. A Job Search Radius slider is visible but not interactive in this static view. The interface has a clean, modern design with purple and blue accents. A Continue button is prominently displayed at the bottom.

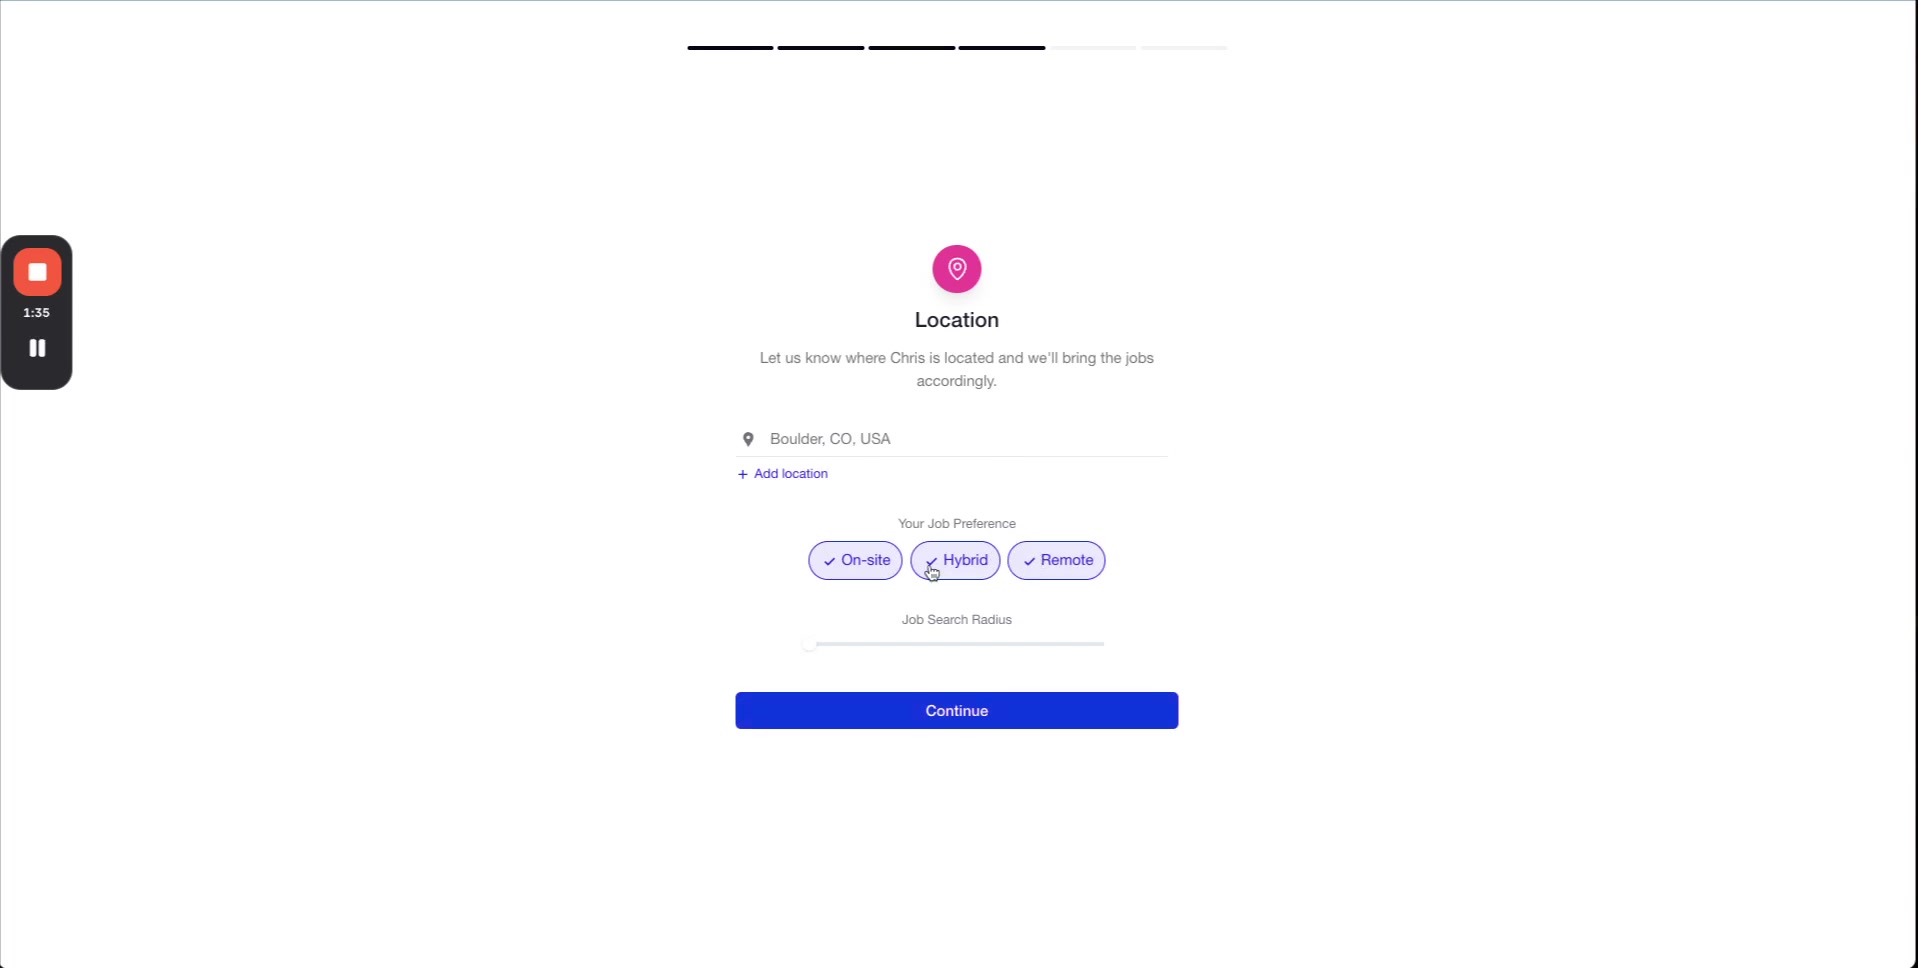
Click Continue when finished.

Step 7: Enter Salary Expectations

Set the client's minimum expected salary using the slider or by typing directly into the input field. Select the frequency (Annual, Monthly, etc.) from the dropdown.

A screenshot displaying a web form titled Base Salary Expectation. Below the title, a brief explanation states, This will help us identify relevant career options and jobs for Chris more accurately. The form includes a horizontal slider, a text input field for Minimum Expected Salary pre-filled with $ 100000, and a dropdown menu for Annual salary frequency. A blue Continue button is positioned at the bottom. A small overlay in the top-left corner shows a play/pause icon and a timer 1:48. The overall design is clean and modern with a white background.

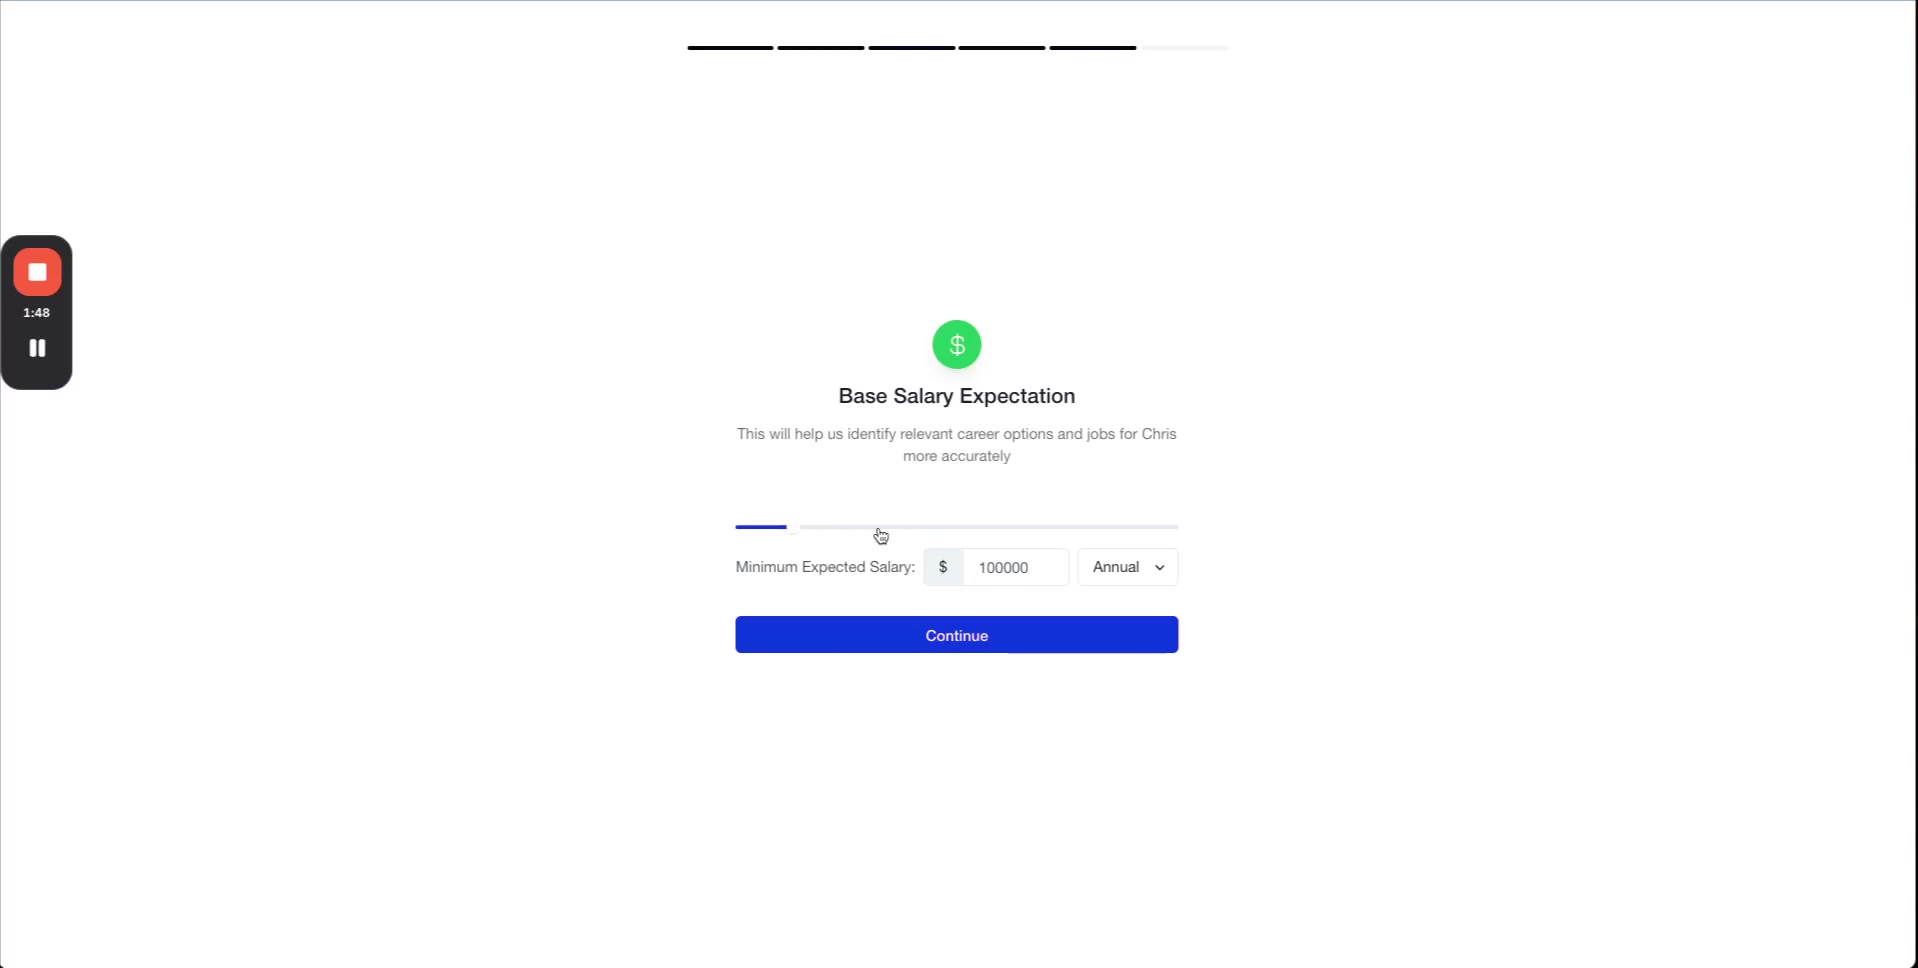
This helps Shapeshifter filter job matches to ensure they align with the client's financial goals. Click Continue.

Step 8: Define the Client's Goal and Target Date

In the final step, you'll set the client's career goal and timeline:

  1. Goal Description: Describe what the client wants to achieve (e.g., "Chris wants to crack into higher paying, senior engineering roles at Big Tech").

  2. Goal Achieve By: Select a target date using the date picker.

A screenshot of a web page titled Goal. A purple icon resembling a target with an arrow is displayed. Below the icon, text reads Let us know what Chris's goal is and when they want to achieve it by and we will build the right journey with you. A text input field prompts Tell us about your goal.... Below this, a label Goal Achieve By: is followed by a date input field displaying dd/mm/yyyy and a calendar icon. A prominent blue button at the bottom reads * Start Journey. A small video playback control overlay with a pause button and timer 1:52 is present in the top left corner of the screen.

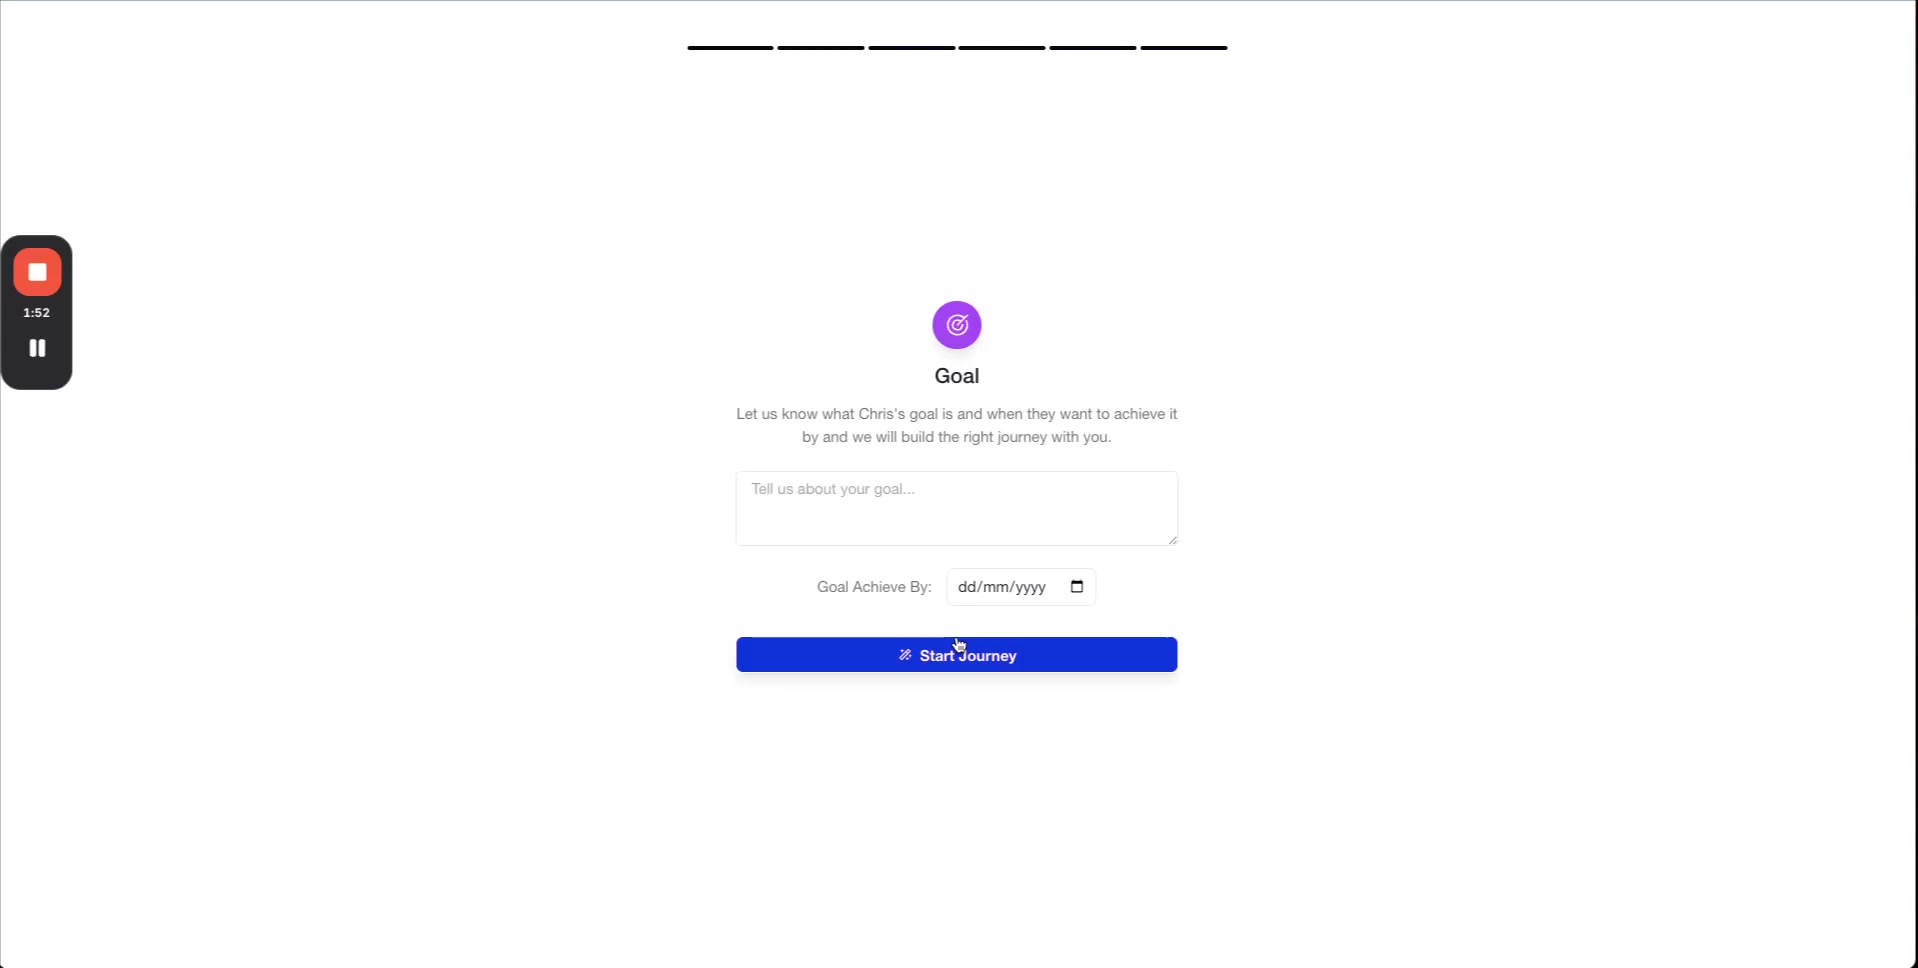
Click Start Journey to complete the onboarding process.

Step 9: Client Dashboard is Ready

Once you've started the journey, the client's personalized dashboard will load. You'll see sections for:

  • Goal — Summary of their objective, salary target, and preferences

  • Careers — Career path recommendations

  • Roadmap — Milestones and tasks to reach their goal

  • Jobs — Matched job opportunities

  • Networking — Networking contacts and opportunities

  • Execution — Tasks, targets, and accountability tracking

  • Documents & Notes — Uploaded files and session notes

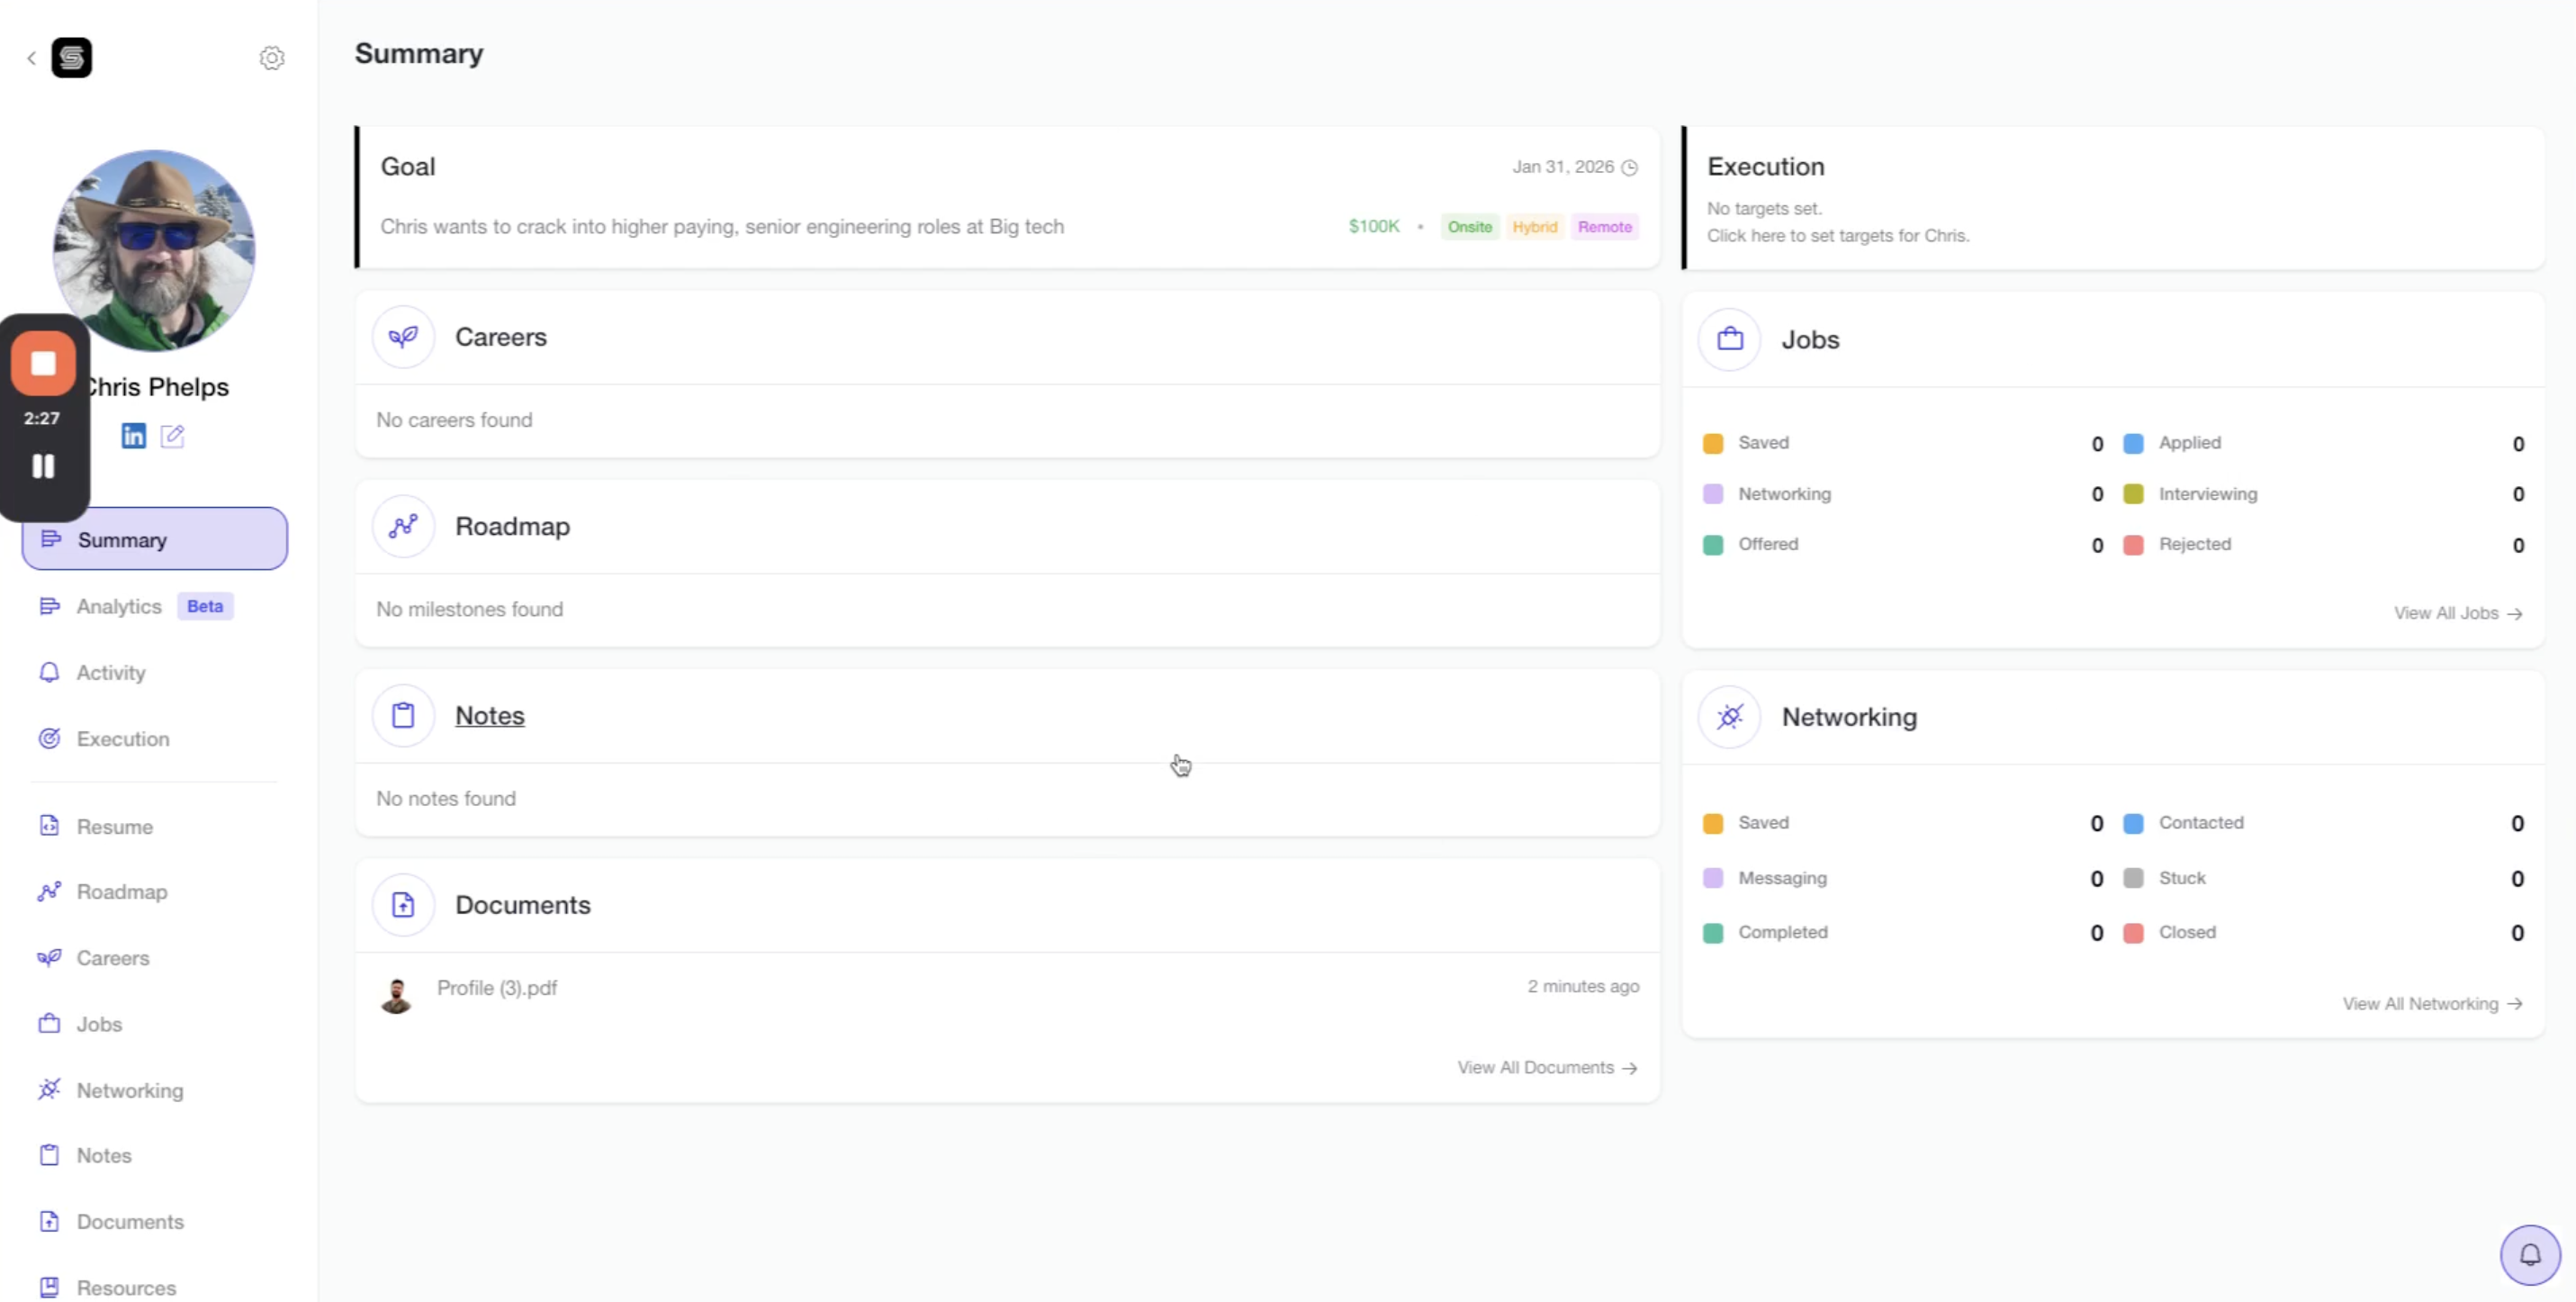
As you and your client make progress (adding tasks, applying to jobs, scheduling networking calls), this dashboard will populate with real-time data and insights.

Your client is now onboarded! Shapeshifter will begin analyzing jobs from its 5M+ job database and generating personalized recommendations based on the profile you just created.

Video Walkthrough

For a complete visual walkthrough of this process, watch the full onboarding video below:

Was this helpful?